Published 2026-01-28 by TechNet Team
The OpenVPN Client Export package in pfSense automatically generates client configuration files and installers for your VPN users. This eliminates the need to manually create configuration files and makes deploying VPN access much easier.
Prerequisites
Before using Client Export, ensure you have:
- A working OpenVPN server configured on pfSense
- User accounts created with certificates (see our guide on creating pfSense users)
- The OpenVPN Client Export package installed
Step 1: Install the Client Export Package
- Log in to your pfSense web interface
- Navigate to System -> Package Manager
- Click the Available Packages tab
- Find openvpn-client-export in the list
- Click + Install next to the package
- Click Confirm to begin installation
- Wait for the installation to complete (you'll see a success message)
Step 2: Access the Client Export Utility
- Navigate to VPN -> OpenVPN
- Click the Client Export tab (this appears after installing the package)
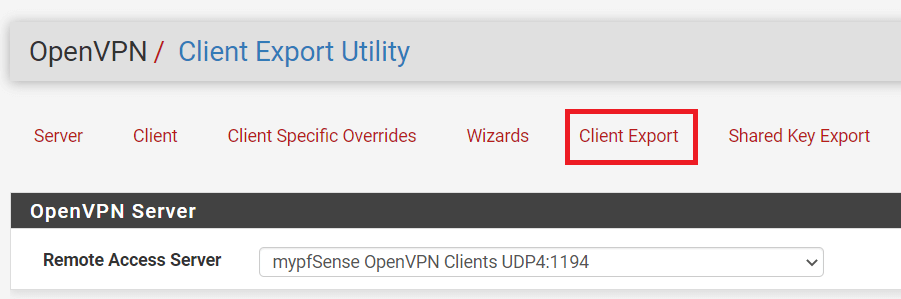
Step 3: Configure Export Settings
At the top of the Client Export page, configure these settings:
Remote Access Server
Select the OpenVPN server you want to export configurations for. If you have multiple servers, choose the appropriate one.
Host Name Resolution
Choose how clients will connect to your VPN server:
- Interface IP Address: Uses the WAN IP directly (only works with static IP)
- Automagic Multi-WAN IPs: Includes all WAN IPs if you have multiple
- Installation hostname: Uses the hostname configured in pfSense
- Dynamic DNS Hostname: Select your DynDNS entry (recommended for dynamic IPs)
- Other: Enter a custom hostname or IP address
Additional Options
- Verify Server CN: Adds extra security by verifying the server's certificate name
- Block Outside DNS: Prevents DNS leaks on Windows clients
- Use Random Local Port: Helps when multiple VPN connections are needed
- Silent Installer: Creates Windows installers that run without prompts
Step 4: Download Client Configurations
Scroll down to find a list of all users with certificates. For each user, you'll see multiple download options:
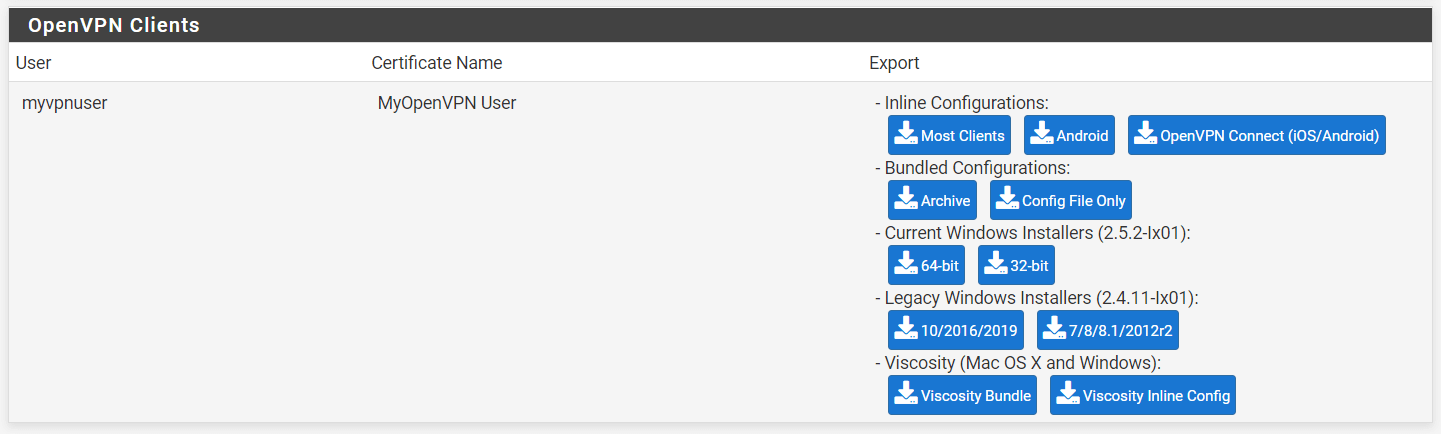
Available Export Formats
Windows
- Windows Installer (64-bit): Full installer with OpenVPN GUI + config (recommended for most Windows users)
- Windows Installer (32-bit): For older 32-bit Windows systems
- Bundled Configurations: ZIP file with config for existing OpenVPN installations
Other Platforms
- Viscosity Bundle: For Viscosity VPN client on macOS/Windows
- OpenVPN Connect (iOS/Android): Configuration for mobile devices
- Inline Configuration: Single .ovpn file with all certificates embedded
Configuration Files Only
- Most Clients: Standard .ovpn configuration file
- Archive: ZIP file containing config + separate certificate files
Step 5: Distribute to Users
For Windows Users (Recommended Method)
- Download the Windows Installer for the user
- Send the .exe file to the user (via secure file share, not email)
- User runs the installer, which installs OpenVPN GUI and imports the configuration
- User launches OpenVPN GUI and connects
For macOS Users
- Download the Viscosity Bundle or Inline Configuration
- User installs Tunnelblick (free) or Viscosity (paid)
- User imports the configuration file
For Mobile Users (iOS/Android)
- Download the Inline Configuration (.ovpn file)
- Send to user via secure method (email, AirDrop, secure file share)
- User installs OpenVPN Connect from app store
- User opens the .ovpn file with OpenVPN Connect
Advanced: Using the Inline Configuration
The inline configuration bundles everything into a single .ovpn file:
- Server connection details
- CA certificate
- User certificate
- User private key
- TLS authentication key (if configured)
This is the most portable format and works with virtually any OpenVPN client.
Security Considerations
- Never email configuration files: They contain private keys
- Use secure file transfer: Encrypted file sharing, hand delivery, or secure portal
- Password-protect if possible: Some options allow password-protecting the installer
- Revoke compromised certificates: If a config file is lost or stolen, revoke the certificate immediately
Troubleshooting
No Users Appear in Export List
- Ensure users have certificates assigned
- Check that the certificate CA matches the OpenVPN server's CA
- Verify the user isn't disabled
Client Can't Connect After Export
- Verify the hostname/IP in export settings is reachable from outside
- Check that the OpenVPN port is forwarded/allowed through firewalls
- Ensure the user's certificate hasn't expired or been revoked
Windows Installer Blocked
- Right-click the .exe file -> Properties -> Unblock
- Or use "Inline Configuration" instead and install OpenVPN separately
Need help setting up VPN for your organization? Contact TechNet New England for secure remote access solutions.